Tuesday, July 24, 2012

Balloon Rockets

I am officially the biggest slacker in the blogging world. It has been over a month since my last post and for that I apologize. Between birthdays, family parties, vacations, and holidays my summer has flown by. I will try do better and not wait so long for my next post.


At the end of June we decided to have my little brother and cousin come up and stay with us. I wanted to do something fun and active and decided that making balloon rockets would be a great and cheap way to keep all of us entertained for a couple of hours. These rockets can be made just using things found around the house.

Materials:
Paper (Any kind works. It's fun to let kids experiment and see what works best.)
Straws
Masking Tape
String
Markers
Scissors

Making the rocket is super simple. There is no right or wrong way to do it, and as I mentioned before it's a good opportunity to let kids use their imaginations and figure out which rocket design will do best. There are only two things these rockets really need. The first thing is a body, we made the body by rolling paper and taping it so it would stay rolled. The only other critical piece is a straw taped on the top. We found out the longer the straw the better the rocket flew. When we used small straws the rocket really struggled and would get caught on the string. After the rocket has a body and a string everything else is really just decoration.


Having fun making the rockets.


When the rockets are finished it's time to attach the "fuel" or balloon to the bottom of them. We found that the easiest way to do this is to blow up the balloon (DON'T TIE) and while it is blown up attach it to the rocket using two pieces of masking tape. Be generous with the length of the tape, it should have one end go over the body of the rocket and the other end a good ways down the balloon. The end of the balloon where it is blown up should face the rear of the rocket (see top picture to help with placement of balloon).


After the rockets are ready to go find a place to "launch" the rockets. We tied the string between our light post and front porch. It was roughly thirty feet. I would recommend only tying down one end of the string and leave the other string untied so it's easy to take rockets on and off the string. When the rocket is on the string make sure to hold the string tight so it does not have any give to it (this will help the rockets to travel better). To attach the rockets put the string through the straw attached to the top of the rocket. I would recommend blowing up the balloon before attaching it to the string (make sure to not tie the balloon). When ready to launch count down and simply let go of the balloon. It should travel quickly down the length of the string. It's fun to have contests to see whose will travel the farthest. 


The rocket does spin sometimes while in flight, hence the balloon on the top of the rocket.


The rocket in flight.


David and I decided to have some fun and try a double ballooned rocket. We were disappointed when it didn't do much different than a rocket with one balloon.

This is a super simple, cheap, and fun activity. We thought it would be a good way to keep the kids entertained for a little while, but it ended up keeping us all happy for most of the evening. We even had some neighbor kids come over and join in the fun. They made rockets up in a couple of minutes and were launching them right along with us. This is a great activity to get kids off the couch and using their imaginations. 

-Nicole

Thursday, July 12, 2012

Ruffled Lamp

There hasn't been much to post the past couple of weeks. Life has been busy and even though I have still been working on things here and there, it has been one of those lulls in my creativity. I have had a couple of project flops, or haven't been able to complete projects to the point where I want to post them. But then last night I had an idea of something that I could work on today. The stars aligned, I was able to run the errands I needed for supplies, I ignored my messy kitchen, and my project actually worked out, so here is the rundown. 

I had wanted to find a drum lamp shade for the lamp in Baby Girl's room, but I didn't really want to pay $15 for it, which is what I had found it for. About a month ago at a thrift store, I found this shade. 


For the $2 price tag, I was more than willing to look past the design because I already knew what I wanted to do with it. Bug was sad that I wanted to cover it because she really liked the stars on it, but I convinced her that I could make it even more fancy, so she said I could cover it. I had seen a cool tutorial on The 36th Avenue where Desiree had covered a lampshade in variegated yarn to create a striped look. I loved it and wanted to try it.


My attempt was not my favorite. Part of it could have been the lamp. Maybe if I had a bulkier lamp, I would have liked the shade better, but I was frustrated that it didn't turn out and so it just sat for a month.


Then last night I had an epiphany. I found an old glass and brass lamp last year for Bug's room. I had always intended to spray paint the brass part white, but ended up really liking the vintage feel that the lamp had. So, I decided to try and see if I could find a similar lamp and cover the shade in something besides the yarn. I found this little lamp for $5 today, and decided to go for Makeover Round 2. I really like the shape of the lamp and the glass part, but it was just a little bit too shiny brassy for me. I still wanted a brassy look, so instead of painting it, I decided to use glaze instead.


I lightly sanded to try and get the glaze to adhere better, and then wiped it down.


I ended up using a combination of these two glazes. I loved the gold one, but it was just a little bit too subtle on its own. Combined with the antiquing glaze, it worked perfectly to tone down the brass, but still leave the vintage feel. 


This is what it looked like after two coats of glaze.


I actually chose something more "girly" than I normally would for the lamp shade. I bought pre-ruffled satin ribbon and glued it on in layers. I asked Bug what she thought of it, and she told me that it looked like a "swirly twirly princess dress," which is a huge compliment coming from her.


This is what it looks like in the nursery. I am really happy with how it turned out. I like the size and shape of this lamp better than the one that used to be there. It is also another project to cross off the list for updating the nursery for Baby Girl. I am hoping that my project rut is over and that this lamp turning out today is the start of another streak of successful projects. I guess I can hope. :)

-Mandi


Linking here to:


Photobucket


Friday, June 29, 2012

Five on Friday: Things I love

Last night I finished a book that I have been reading the past few days. It reminded me how much I love to read. I haven't made it as much time for reading in my life the past few years, but when I find a good book or a good series, all I want to do is read. Anyway, thinking about how much I enjoyed this book, made me think about how much I have enjoyed some other things lately. So, instead of doing completed projects for this week, I decided to write a completely random post about some of the things that I have been loving lately. 

1. The Fable Haven Series by Brandon Mull

Link


I know that most of my siblings have read this, and I am late jumping on the bandwagon, but these are really good books. I read the first one a few years ago, but read books 2 and 3 this week and still have 4 and 5 to look forward to. I also love that all of the books are out so that you can read them one after another and not have to wait years for the next one to come out. They are children's' fantasy/adventure books, so they read quickly, and I found them very entertaining. 

2. Homemade Spinach Tortillas


I saw this recipe on Pinterest awhile back and decided to give it a try. The recipe is from here. They were really good, fairly easy, and I have even made them a couple of times since. We have eaten them with tacos, fajitas, and tostadas. 

3. 9-month olds


This is a given, that I would love my baby, but she has been so happy and so much fun lately, that I had to add her to the list. Her little smile and her funny faces make me laugh. She is crawling and into everything, putting everything into her mouth, and keeping me on my toes. She gives great hugs and slobbery kisses, and makes me so thankful that I get to be her mom. 

4. 3-year olds


Another given, I know, but my little Bug is so fun and so smart that I had to add her as well. She has not been super cooperative with pictures lately, so most of the pictures that I have are silly or extremely candid. These pictures were after I asked her to just smile and be normal. I even gave up on that and just asked her to sit still for a minute. This is what she gave me. 

5. Caribbean Workout exercise videos. 


I have not been very dedicated to losing baby weight. I am trying to get more motivated, but with two little girls it can be hard to find the time. So, I came to the conclusion that some things like running and going to the gym may not be for me right now, but I can do an exercise video even with my girls. Little Bug loves doing yoga with me and makes me laugh the whole time. I do feel better when I do them, and as soon as I get back into a regular workout schedule maybe I can start adding running and some other things back in as well. 

-Mandi

Tuesday, June 26, 2012

Tree Branch Mobile

I have a pretty awesome husband. When I was pregnant with Little Bug, he surprised me one weekend and converted the spare room of our apartment into a nursery. He chose the bedding and everything. I loved it so much, and it was still in such good condition, that we pretty much left everything the same when our little baby girl was born last year. It is her lot in life to be the recipient of many many hand-me-downs. I did want to add a few things to the nursery that would be just for her, and so I have been working on some projects here and there. 


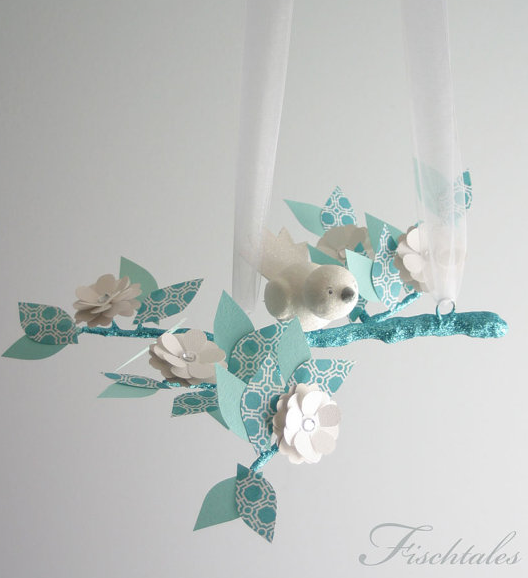
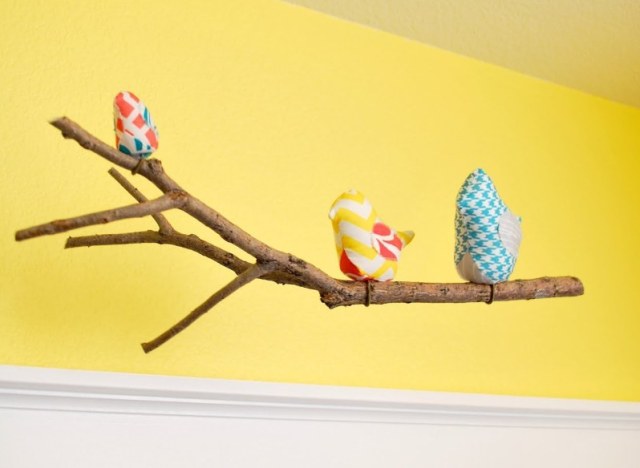
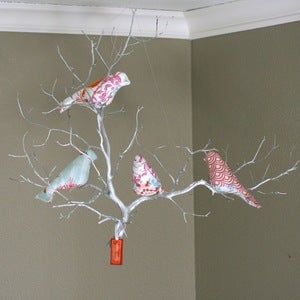
I wanted something to fill the space above her changing table. I have seen several really cute tree branch and bird mobiles, so I decided to give one a try. It was surprisingly easy to make, came together well, and helped to bring some color and interest to that part of her room. 


Here are some of the mobiles that inspired me:


Source

Source
Source


Source


Source

Here is how I did everything:

1. Branch: I started with just a plain old tree branch. (We had a huge windstorm a few months ago, and there were branches strewn everywhere. I wanted it to be long, I think that the one I chose was about 3 feet long. I did trim off some of the smaller branches that were coming off of it, until I got a shape that I liked. I used Modge Podge to clue white strips of paper around the tree for a paper mache type look, but I think that it would have been easier/less messy if I had used spray paint, and I think that I would have liked it just as well.

2. Flowers: I drew a simple flower shape. I ended up using one with 5 petals and one with 6 petals so that I could layer them. Each flower requires two flower cut-outs, which I cut out of patterned scrapbook paper. I then put a dab of hot glue to stick the 5-petal flower onto the 6 petal flower. Then, fold the petals in toward the center and crease slightly so that they stick up a little bit. I used some circle rhinestone stickers that I had for the flower centers, but you could use buttons, or paper circles too. 

3. Leaves: I drew a football shape pattern and used it to cut leaves on green cardstock. I wanted some variation in the green, so I used three differed shades of green for the leaves. I then folded then in half lengthwise so that they would look more three-dimensional.

4. I used my trusty hot glue gun to stick the leaves and the flowers to the branch. I tried to arrange the leaves first in small clusters and then put the flowers where I thought they looked good. I didn't really have any rhyme or reason to this part, I just stuck them on however. 


5. To hang the mobile I bought some of the small hooks that have thread on one end so that I could screw them in. I used two screw/hooks, drilled small pilot holes in the branch, and strategically placed them behind some leaves so they were hidden. I then used some clear fishing line to hang it from some more hooks in the ceiling. 


I haven't been happy with any of my attempts at making a bird yet, but I think that I'll keep trying. I do like it even without a bird, I like how the white stands out against the brown wall, and I like the color that the green leaves bring to that side of Baby Girl's room. 

-Mandi


Wednesday, June 13, 2012

Sweet Shoppe


Sometimes I get crazy ideas for projects that turn me into a crazy person trying to finish them. A couple of weeks ago, I decided to try and make a felt food sweet shoppe for Little Bug's birthday. I started out fine, but as usual, I got a little bit carried away with what I was trying to accomplish, and was cramming at the last minute to try and get everything done.

It started out with a free shelf that I got. It is one that was meant to go above a toilet in a bathroom, but after I painted it, I had been moving it around trying to find the perfect use for it. So, it became the base for the sweet shoppe. I just need to add a back to it. I had some leftover beadboard from another project, so I just cut it to size and nailed it to the back.


There are so many cool resources for felt food. I found many free tutorials and patterns which I used to make cakes, cookies, cupcakes, and many other desserts. I also did some winging it, and made some things up on my own. I also bought a couple of patterns from some Etsy shops, when I got too frustrated trying to figure things out on my own. 

This is what I ended up with: 

A chocolate cake with raspberries. 

A strawberry cake. 

Some sugar cookies.

Three swiss cake rolls.

Three lollipops. (It's funny, because I totally made these up at the last minute. They turned out ok, but not great and they are her very favorite thing. I have to remind her that she shouldn't really lick them.)


I wanted a cute way to display all of the desserts, so I made some wood cake and cupcake stands using supplies from Michaels. For the sweet shoppe sign, I cut a piece of foam core board that I had down to the size that I wanted. I cute the banner out of scrapbook paper and Modge Podged it onto the board. Then I used my vinyl cutter to cut out the letters for the sign.


Can I just say that I love felt/fleece food. I ended up using both fleece and felt for this project. It is really forgiving, easy to work with, and it looks pretty real too. Once I got into the swing of things, it didn't take too long to make everything. Some of the details like the shell border, the sprinkles on the cookies, etc. did take a long time, but I think that they were worth it. 

Here are some great links to tutorials and patterns that I found helpful. The patterns that I bought were from Etsy, which is also a great source for ideas. I loved just looking through all of the felt food to try and get ideas, or to figure out how to make something that I wanted for my sweet shoppe.

Feed Dog - This is where I got the swiss cake roll pattern.

Fairy Fox- This blog has many free tutorials as well as patterns for sale. 

Pink Tea- She has a brownie and a sugar cookie tutorial. I used this as a guide for my brownies.

Bugga Bugs Shop- This is the pattern that I used to make the cakes.


There were other ideas and tutorials out there that I didn't get to yet. I had a couple of failed cupcake attempts, but I will keep trying. I figure that is the beauty of this gift, I can keep adding to it over the years as I get new ideas. 

-Mandi

Linking to:

The 36th AVENUE
Photobucket

Sunday, June 10, 2012

Thinking Outside of the Box


For as simple as we kept the celebration part of Little Bug's birthday, we definitely got caught up in some bigger projects for her presents. She loves to play out in the dirt, digging for buried treasure, making mountains, and many other games. We have been wanting to build a sandbox for her, and decided that her birthday would be the perfect deadline for trying to get it done.


We have a fun little playhouse in our back yard, and decided that to the side of it would be a good place for the sandbox. The playhouse provided support on one side, the sidewalk on another, and we figured that the dirt we dug out on the backside would provide support on the third side. Oh yeah, that is the other thing about this location, it ended up being a triangle instead of a square. It worked out really well though, because it keeps the kid areas of the yard somewhat together, and was an easy solution for keeping the weeds down around the playhouse. Once we decided on a location, Jared went to work digging out the dirt.


We debated about what to use for the sides of the sandbox. We wanted something affordable and that would weather well. After pricing out treated wood and Trex material, we figured that it would cost us between $100 and $150 to build it. We thought we could do better though. What we ended up using was vinyl fence pieces. We were able to buy scratch-and-dent pieces vinyl fence pieces from a vinyl fence company for around $20. The final size ended up being about 96 x 96 x 70".


Vinyl is actually fairly easy to work with. We used our compound miter saw to cut the pieces to the lengths that we wanted, and then used a Roto-Zip to cut out slots in the fence posts for the side pieces to slide into. Because we needed a triangle shape, the vinyl was perfect because we could turn the posts to angle them the direction that we needed.


We debated about lining the bottom in something hard, but Jared dug down far enough that the ground was very hard. We opted for lining it with a weed barrier instead, and then just put the sand on top of that. To keep the neighborhood cats out of it, we do keep it covered with a piece of vinyl lattice when it is not in use.


I think that it worked out well. As usual, it is far from perfect, but it looks nice and Little Bug loves it. It is hard to make her come inside when she is out there playing. Now my only worry is dealing with sand all over the house all summer.

-Mandi

Thursday, June 7, 2012

C's Room Part 3- Project Center


C likes to create. He always has a project going. His latest was creating a book to give his cute niece for her third birthday. As we redid C's room we wanted to make a place for his projects and the space under his bed seemed the ideal spot.


We gave his old desk a facelift (paint and handles) and picked up a second hand chair for a few dollars. Isn't it funny that it took seeing this picture to realize that we need to lower the chair. He has been using this for months without us noticing that his legs don't fit under the desk and he never said anything about it either.


C needed a place to keep his markers, colored pencils, crayons, etc. The hooks and buckets came from Lowes. We screwed the hooks right into the board that bolts the bed to the wall. The buckets were perfect. They were the color we wanted and came with a hole in the top making it easy to hang them.


This art station has been a great place for C to work on projects. The only drawback is that the bed makes for a low ceiling over the work space. There have been a couple of times when C has forgotten and gained a bruised head

Joanne

Linking to:


katherines corner 

Related Posts Plugin for WordPress, Blogger...