
12 DAYS AGO- I catch a mysterious virus that knocks me out for nearly a week
8 DAYS AGO (around 6:00 pm)- I am finally getting home after a long 10 hour day at work catching up, when my phone rings. The conversation goes something like this:
- Me- "Hello."
- Ben- "Hey."
- Me- "How was your ride?" (Ben is down south for a work conference and went for a mountain bike ride after it was over.)
- Ben- "Uh, I think I broke my shoulder." (Wincing, with a voice full of pain.)
- Me- "WHAT??"
- Ben- "Yeah, I went down at the end of my ride. I think I broke my shoulder. I'm on my way to the InstaCare, but don't worry. I'll call you later."
- Me- "HUH? What happened? Are you ok? Who's taking you? How did this happen? What were you doing?" (Just the kind of discussion a guy wants to have right after his shoulder and ego have been crushed and he's in agonizing pain.)
- Ben- "I really can't talk right now. I'm with Brimy (a friend). I'll call you later. Love you."
- And before I could say I love you too, the line went dead.
8 DAYS AGO (around 9:30 pm)- Another phone call. The verdict:
- Separated Shoulder + Elbow Fracture + Forearm Hairline Fracture + Broken Wrist = one Broken Husband and one Sad Wife too far away to be any help
7 DAYS AGO- My high school hosts an annual Art Exhibit that I am in charge of. This year all of our proceeds go toward Chloe's Sunshine Playground (a 100% ADA accessible park we are trying to build in our community). I am planning on posting about this soon, so I won't go into any details here, but let's just say I logged in a 13.5 hr day at the school.
6 DAYS AGO- I say goodbye to my little brother. I will not see him again for 2 years (talk about an emotional roller coaster week).
3 DAYS AGO- Ben and I both get to speak in our church and I have to prepare a lesson for a Sunday School class full of 6 year olds.
So my life has been a little chaotic. I have meant to post. This little pillow has been made for the last 2 weeks and every day since I have finished it I thought I might find a minute and post. Fourteen days later, I finally found one.
Without further ado (or excuses) I give you the...
Chevron Striped Pillow
The dimensions for this pillow are for a 20"x20" pillow.
 |
| The Finished Product |
Materials:
1/2 yd 45"woven cotton fabric
3/4 yd 45" coordinating woven cotton fabric
(This will also be used for the two pieces that make the envelope closure on back)
(This will also be used for the two pieces that make the envelope closure on back)
20"x20" pillow form
rotary mat, cutter, and ruler (not necessary but extremely helpful)
Cutting Directions:
Cut 18- 4"x 4" squares from 1/2 yd fabric
Cut 18- 4"x 4" squares from 3/4 yd fabric
Cut all 36 squares in 2 equal halves diagonally creating 72 triangles.
 |
| Pic 1- Cutting, pinning, stitching, and pressing steps for individual squares. |
Cut 2- 15"x21" rectangles out of the remaining fabric from the 3/4 yd (the 15" length should be parallel with the selvage edge).
Sewing Directions:
Take one triangle from each kind of fabric and pin right sides together along the diagonal edge. (Pic 1- top right)
Using 1/4" seam allowance, stitch together, remembering to backstitch. (Pic 1- middle right)
Repeat on remaining triangles until there are 36 squares once again with each square containing one triangle from each fabric. Press all your seams open. (Pic 1- bottom right)
Lay out your squares so they make the Chevron design, or be creative and feel free to make your own pattern. (Pic 2- top left)
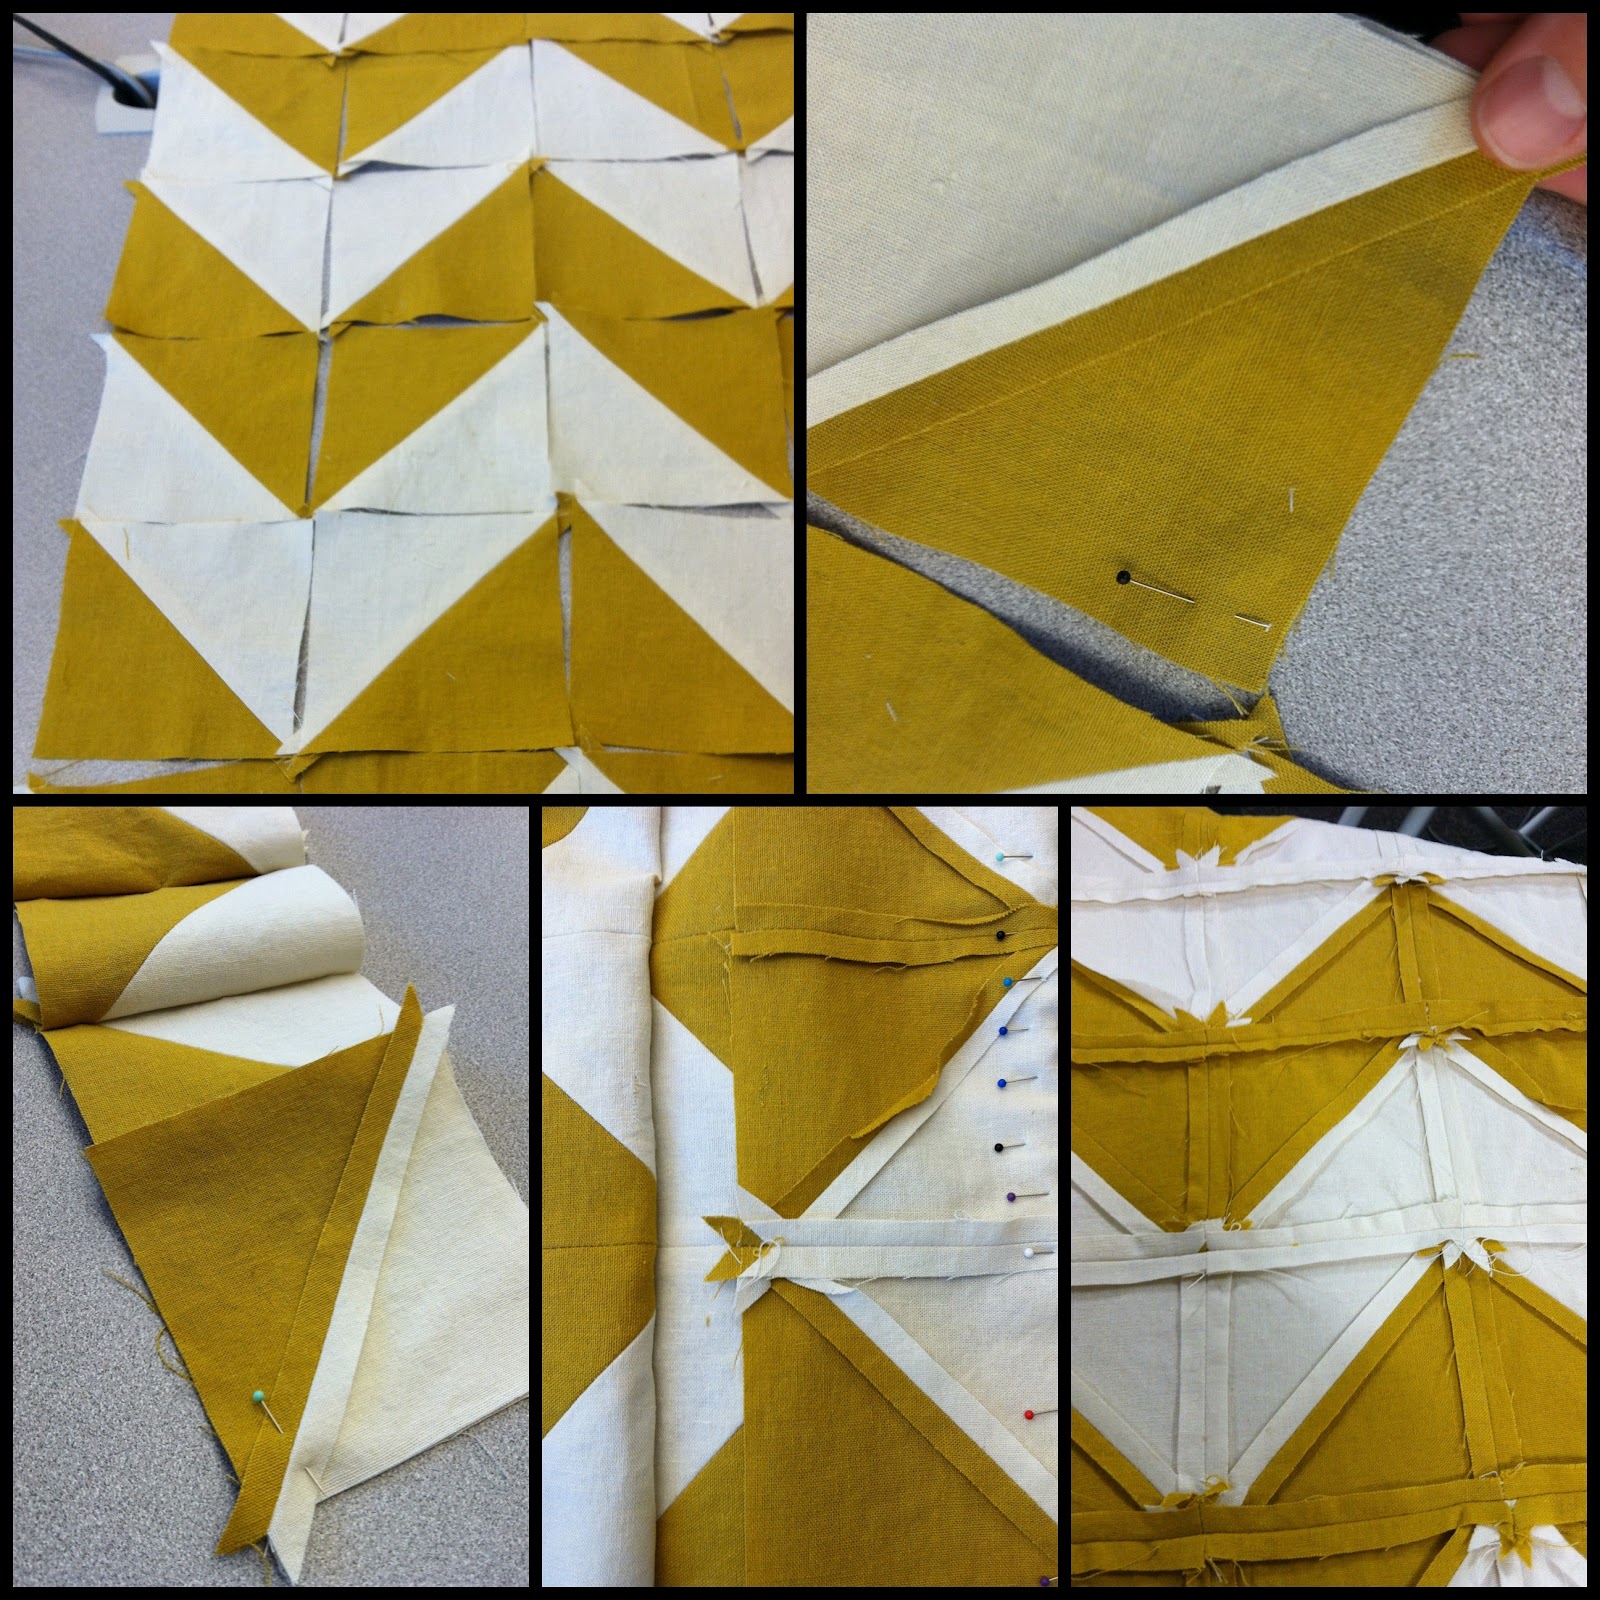 |
| Pic 2- Laying out design, pinning rows, stitching rows, and pressing all seam allowances. |
Begin pinning together your top row going across the pillow. Make sure you are pinning the squares right sides together. Using a 1/4" seam allowance, stitch each square together in row. (Pic 2- top right, bottom left) Press open all seams.
Repeat on remaining 5 rows.
Once all rows are sewn, pin the top row to the 2nd row right sides together making sure to match up seams exactly. Stitch together using a 1/4" seam allowance. (Pic 2- bottom middle) Press seam open.
Repeat until all 6 rows are sewn together, creating a 21"x21" pillow top.
To create the back and finish the pillow top, you will be creating an envelop opening using your last 2 rectangle pieces.
There is an excellent tutorial on Sew 4 Home for the envelop back method for pillows. I'm going to send you there to finish, because their directions are stellar and I don't think I can top what they've done. You will want to skip to past step 7 to the At Your Sewing Machine and Ironing Board section on their tutorial.
Pheww! Marathon post! Let me know if there are any questions or problems with the tutorial.
-Michelle
Wow! With all that going on, I'm surprised you pulled this post together!! That's a lot of heavy stuff for a short time period! Great pillow, though. Stopping by via the live laugh rowe blog hop. Your blog is awesome! Following via GFC. Hope to see you around www.bearrabbitbear.com soon!
ReplyDeleteHey thanks Melanie! It was a little crazy, but mostly I'm just full of excuses :) I am definitely on my way to check out www.bearrabbitbear.com
ReplyDeleteNice tutorial, I love it--and sorry about your crazy week!! I know how that goes:)
ReplyDeleteShannon@SewSweetCottage
Gorgeous, love the colours and the pattern. Perfect!
ReplyDeleteI am so obsessed with chevron right now. I want to make chevron pillowcases to cover the ugly pillows that came with our couch. I'm hoping to find chevron fabric but I really dig the added texture yours has.
ReplyDeleteYeah, this pillow definitely takes some time. It would be a lot faster to find a chevron print. I did like the texture that quilting the fabric gave it. I'm sure you'll be able to find a chevron print. The Humble Nest blog has a list of 30 online fabric spots, here's the address to the post
ReplyDeletehttp://thehumblenest.com/2012/01/23/30-more-and-then-some-great-places-to-buy-fabric-online/
Good luck in your fabric quest!
Great tutorial!!
ReplyDeleteSorry to hear about your hubby's injuries. My guy likes to mountain bike too, but luckly hasn't had a bad fall.
Hope this week is a great one for you!
Just finished mine, but the pillows I have all don't quite fit the 15"x17.5" finished pattern so I made a border to extend it out. I also did a little tight straight-stitch border around the chevron pattern of the colored sections. It really made the whole thing 'lay down' a bit more and highlight the chevron pattern. I'm rather 'new' to sewing, although I've done some here and there growing up and this will be my first 'big girl' project. What a task! I feel like I just completed a mini-quilt!
ReplyDeleteCongrats, yours is the first project that I followed, instruction-to-instruction, to a T! Now, on to make the back and see if I can't pull this thing off! (Second matching pillow next? Phew, we'll see if I have the strength!) Thanks!
prabhat satta
ReplyDeletefinal ank
220 patti
prabhat satta matka
final ank
220 patti
indian matka
kalyan final ank
kurla day