Tuesday, April 17, 2012

C's Room Part 2- Pallet Couch


C likes books. At bedtime every night we read a story together. After we hung his bed I would climb up there to read with him. I know the bed is secure but I'm a lot heavier than he is and didn't want to keep testing the strength of the bed by getting on it every night.  Inspired by the pallet furniture pins on Pinterest we created a reading couch for C's room.


We found free pallets in the classified ads and my carpenter (husband) came up with the plan to put it together. We wanted a couch that also included storage for some of C's little toys.

The white (they were black but spray painted white to better match his room) casters on the bottom of the legs are off the bottom of an old sofa. I don't know why my husband saved them but they did come in handy. They increased the height of the couch enough that our plastic drawers from Wal-mart fit perfectly underneath making a nice toy storage area.

We left the wood natural. To protect it we brushed on the same varnish that was used on the hanging bed.


I bought foam and fabric for the cushion at JoAnn's Fabrics. JoAnn's cut the foam to size and I sewed the cover for it.

I wanted big striped pillows for the couch back but couldn't find any pillows the right size. Then I looked for fabric to make the pillows but again couldn't find any gray and white fabric with big stripes. Finally I decided to make the striped fabric.
 
First I bought two standard sized white pillowcases. I used blue painter's tape to cover the area I wanted to stay white. To make this easier I bought the two-inch tape and let the width of the tape be the width of the stripes.

Since I knew I wouldn't be able to make stripes evenly without a guide, I used Photoshop to create a page of white and light gray two-inch stripes. After printing several copies of this guide I taped them together to make a sheet about the same dimensions as the pillowcase and slid it inside the case attached to a piece of cardboard. The cardboard helped stabilize the project, kept the guide sheet from moving around and the paint from bleeding through the fabric to the back side.

I found fabric spray paint at Auto Zone and bought 2 cans. I used it to paint stripes on both pillowcases, front and back. This paint covered the white fabric well. It dries a little stiff but that was no problem since these pillows are used as a backrest.

I filled the pillowcases with standard sized pillows and sewed button holes and three large gray buttons on the ends of each pillow case to hold them closed.

We have been really happy with C's reading couch. We use it every night. It's strong, comfortable and was a cheap addition to his room.

I do have a couple more pictures of this process but cannot find them now. When they're found I will add them to this post.

-Joanne

Saturday, April 14, 2012

C's Room Part 1- Hanging Bed


It was time to redo C's room. We hadn't changed it since he was 2 and a room that works for a 2 year old (sorry no pictures of the room before) is not necessarily good for a 7 year old.

Our goal was to organize his things and give him more floor space for playing. C likes to play with his "guys" (Rescue Heros etc). He likes to draw, to read and he loves sports and being active.

Our first project after painting the walls was to hang his bed. We had seen a great boys room on The Bumper Crop where they fit 3 boys in one small room by hanging the beds.


This was the inspiration for C's bed but my carpenter (husband) made up his own way of building it. We used chain rather than rope to hang it. He tied it in to the roof trusses for security.

While it's a hanging bed it's not a swinging bed. We knew that would be a disaster and bolted it to the wall at the head and back sides.


We thought about making a ladder but found one at Lowes that was perfect. It's sturdy and lightweight.  C can use it to reach all kinds of other things. It can also be folded and hung up or stored away if needed.

This not only gives him more floor space to play, it also helps burn up a lot of his energy as he climbs up and jumps down over and over again

I should mention that we do have a railing (the kind that slides under the mattress and comes up about a foot above the mattress) that we use at night to make mom happy. C doesn't like it much and it comes off every morning when he makes his bed.

-Joanne

Linking here to: Blissful and Domestic and here to: Joy 2 Journey.


Thursday, April 12, 2012

A Little Table Redo

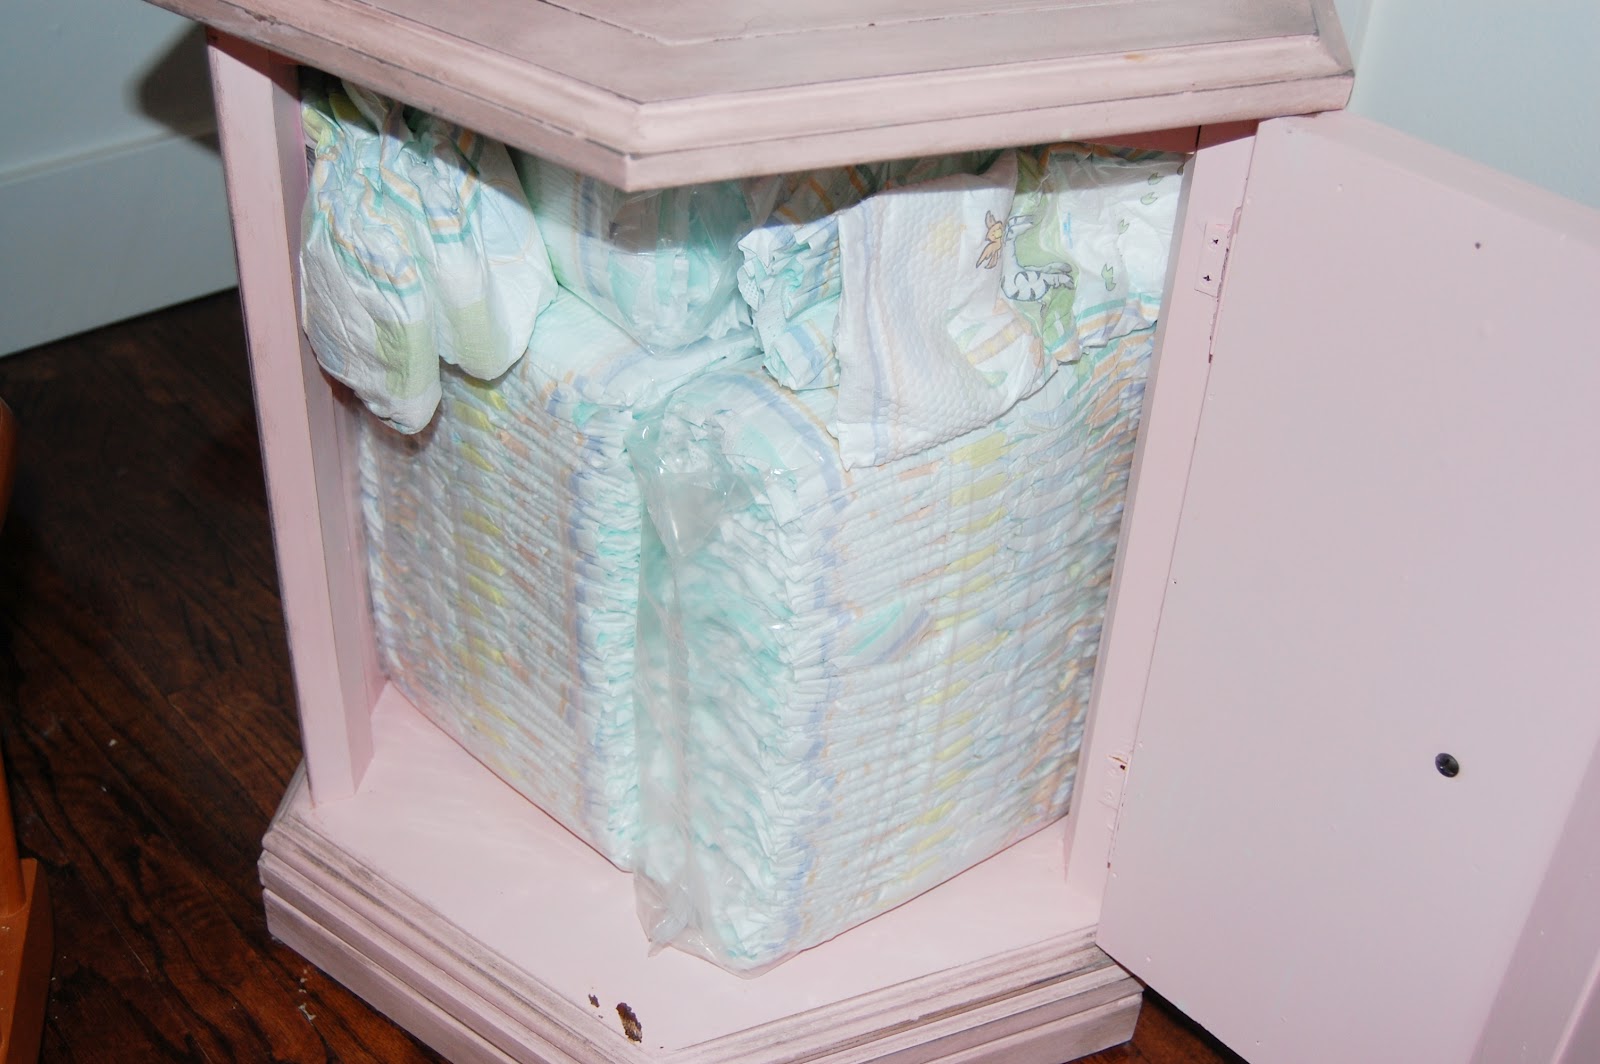
Here is another piece of hand-me-down furniture from my mother-in-law. It was a little hexagon table that had a few chips and dings in it. She gave it to me right when we moved in, when I was in my redo everything frenzy stage, which is why it is done.


I wanted to use it as a little table in my nursery next to the rocking chair, so that I could put a lamp on it and have a place to set things down. The previous owners of this house loved the color pink, our garage is pink, our sheds have pink trim, and even the kitchen had pink and blue wallpaper in it. They did leave a can of Pepto Bismol pink paint behind in the shed, which actually turned into a pretty color when mixed with some white paint that I had on hand.


I loved the pretty details of the handles, so I sprayed them with Krylon Oil Rubbed Bronze spray paint.


I distressed it a little bit with my electric sander, and then used Valspar Antiquing Glaze to give it some more character. The inside provides some great storage for extra diapers, so I don't have to have the big boxes hanging around forever.


When any of my husband's siblings have seen this little table, they tell me that they remember having to dust it growing up. It makes me laugh, but I am happy to be re-using something that has a story behind it, and that was free.


As usual, with my projects, it is far from perfect, but it is useful and fits in well with the color scheme in my nursery. And for one last picture, the side-by-side comparison:

-Mandi

Tuesday, April 10, 2012

Name Frames


My daughters are both named after their Grandma's. Johana is named after my mom, Joanne, and Charlotte is named after my mother-in-law, Charlene. Both of their names are somewhat unique, have family significance, and fit them well. I wanted a cute way to display their names and the meanings of their names. I had seen various ways of doing this, and so when Johana was born, this is the design that I came up with, and it was easy to repeat for Charlotte. Michelle found the frames on clearance at a local craft store, and I used white vinyl to put the lettering on. They both have colored walls in their rooms, so the frames show up really well.


For the names, I liked the font, Windsong from dafont.com, but I actually didn't really like the capital J or C, so I used the J and C from the font Scriptina. The bottom font, with the name meaning, is Copperplate.


I have also discovered something about my decorating style; when something works, I tend to stick with it. Both girls have long white shelves in their rooms. They are actually shelves that my dad built for us growing up. I ended up with them and have repainted them 3-4 times. They are cute and have pegs to hang things on. I use them to hold the name frames, pictures of the girls, and to hang their blessing dresses.


I really like how they turned out, and I like the way that they look in the girls' rooms.

-Mandi

Saturday, April 7, 2012

Easy Easter Gifts


I decided I wanted to make some kind of a treat for my neighbors, so I got on to Pinterest for some inspiration.  I found a super cute design from HappyClippings.com under their D.I.Y Paper Easter Bunny, Chick, and Carrot Cones page. I modified the pattern so I didn't have to go to the store to buy any supplies.

I wanted my cones to be big enough to hold some Easter Eggs so I drew my own pattern for the cone. I also used a packet of cute scrap booking paper I bought from Walmart for about a buck. The ribbon isn't material, it's just the cheap kind that can be curled with scissors. I used normal tissue paper for the insides of the cones.


I made the mistake of thinking all glue sticks dry clear. They do not. I wouldn't recommend using a blue glue stick because any glue showing will dry blue.


Trace the pattern on the back side of the paper so that there are no pencil or pen marks showing on the cone.


Cut the paper.


I found that it made it a lot easier to fold the paper into the cone shape before gluing it. After I made the cone shape I put glue on the flap that will be on the outside and put it together.


After gluing it should look like a cone.


I punched out both sides of the cone at the same time, that way the holes will be even.


I cut the ribbon about 27". I tied the ribbon on to each of the holes. I left some extra ribbon hanging off the end so I can curl it. I added tissue paper to each of the cones.


I wanted to make these a treat for my neighbors so I filled up Easter eggs with candy and added them in and added a poem about Easter.

-Nicole

Thursday, April 5, 2012

Easter Dresses

When Bug was born, we were given so many cute clothes for her. One of my favorites was a red dress with white polka dots. It aslo came with a cute white shrug, that soon became the go to sweater for any sundresses that she wore. If you will notice, the tag on it says 9 months, but Bug actually wore it until she was about 2 1/2. Like I said, it was an outfit go-to for us. 


I have wanted something similar in a larger size that would fit Bug right now, but never found one at the right price point. I did find an inexpensive white sweater at Wal-Mart, I think that it was $4, but it was long and long-sleeved, not exactly what I was looking for. I bought it anyway, intending to cut off the sleeves and shorten it a little, but instead it just sat in my project pile. I thought about using it as it was, but it really didn't fit her right. 


Well, Easter provided the motivation that I needed to finally take the plunge and cut up this perfectly fine, brand-new sweater. I had Bug try it on, and then used my rotary cutter and cutting mat to take 6 inches off the bottom and to cut the sleeves. Then I just hemmed all of my cut edges and I was good to go. It isn't quite as cute as the Carter's shrug, but it fits her cute, and will definitely work for what I want it for.


So, if all of the above frugality wasn't enough, I was an even bigger cheapskate  frugal mom for the actual dresses. Last year, I bought Bug 2 of the same dresses in different colors and sizes. I bought the purple one for her second birthday outfit, and then later in the summer bought the pink one when it was on clearance at the end of the summer. Even though the purple one is still too big for Baby Girl, with a little shortening of the straps with some folding and tacking, it fits her pretty well. Then, as she grows, I can untack the straps and it will fit her for a longer time period. Here are the cute little Easter dresses and sweaters. I am happy with how they turned out and even happier that I didn't have to spend any new money on them.


My little models were asleep when I actually had a minute to take some pictures, but I plan on taking lots of pictures on Sunday and will post some then.

-Mandi

Tuesday, April 3, 2012

A Salute to David and Plumbers Everywhere!

Some people may be wondering why I would post a salute to David and Plumbers everywhere on a crafty blog. Well I gained a new appreciation for plumbing today and realized just how "creative" one has to be at times when fixing pipes.

Last May David and I purchased a trailer. We figured it was the cheapest way to live for two considering the lot fee is all the rent that needs to be paid. This trailer has been quite the adventure. We repainted the whole inside; sadly I did not take before and after pictures or else they would be on this blog. Before we moved in nobody had lived in the trailer for about a year. We had our concerns about the electricity and plumbing, but decided to go with it anyway. When the water was connected and I swear the pipes shot out more water than they held. David had a crash course in plumbing. Thanks to countless hours he put in, a lot of advice from Lowes and Home Depot employees, and a phone call with questions to a plumber friend David was able to get our trailer livable. I think we both gained a new appreciation for running water in a home.

After that experience David and I are ultra sensitive to any dripping noise we hear. This past January some skirting on our trailer came off. When David putting the skirting back on, much to our dismay, he noticed an icicle hanging from one of our pipes. We haven't been able to much about it until now because of it being too cold, but decided today would be dedicated to fixing it.

Where we accessed the leak
I had to be brave and get under the trailer with David. The crack in the pipe was right on a T-joint. David's plan was to cut the joint and replace it. The joint was in an awkward spot. It had other pipes close above it and one to the side. There was also a wire hanging down right in front of the pipe. Needless to say an extra pair of hands was needed to make sure only what needed to be cut was cut. 

Under the trailer
Under the trailer was super super super muddy and wet. We were both covered with mud, water, and instillation. We found we stayed much warmer when we had a water proof layer on top. That way the water isn't directly on the skin.

David covered, and no that's not mud on the top of his lip, it's his attempt at Mustache March. 
In the beginning we tried cutting the pipe with a grinder. As we got going we realized we could not get it to go all the way through. David got his "creative" on and tried to cut coming from different ways or holding the saw at a different angle. We soon had to face the sad fact that a grinder is not the most effective way to cut something in a tight spot. It's really hard to get different angles and it does spark a lot. We ended up using a Sawzall, which worked beautifully and no sparks. 

Sawzall on the left, grinder on the right
The cut up T-joint
After two union joints, three nipple pipes, one elbow joint, one T-joint, a roll of teflon tape, and a can of thread sealant we, well mostly David, was able to get our trailer up and running again and I was able to learn just how much work goes into plumbing. So this is my salute to David and Plumbers everywhere. Keep up the good work and keep being creative with those pipes!

A couple of tips if you decide to D.I.Y plumbing. Telfon tape and thread sealant is your friend. Go around the thread at least 8-9 times. Get familiar with monkey wrenches and have a selection of sizes they help out a lot. Union joints are a stroke of genius. Where appropriate definitely use them.

Dave and Me after a dirty, rough day of plumbing.


Related Posts Plugin for WordPress, Blogger...